
Related Article: https://support.veniosystems.com/hc/en-us/articles/16779304209043
Securing Windows SQL Server connections is an important part of protecting an organization’s data. It is important to ensure that only authorized users are able to access sensitive information and that data is being transmitted securely.
There are several steps that should be taken to secure Windows SQL Server connections.
1.) Ensure that the Windows server is properly patched and updated with the latest security updates. This will prevent attackers from exploiting any known vulnerabilities in the system.
2.) Ensure that the Windows server is properly configured to use two-factor authentication for user logins. This will add an additional layer of security to the system and help to prevent unauthorized access.
3.) Ensure that the Windows server is configured with strict access control lists. This will help to ensure that only authorized users are able to access the system and any sensitive data stored on it.
4.) Ensure that the Windows server is properly monitored for suspicious activity. This will help to detect any unauthorized access attempts or malicious activity.
5.) Enable encryption for Windows SQL Server connections. This can be done by enabling the encryption option in the Windows SQL Server Configuration Manager. Once the encryption is enabled, the client must also be configured to support secure connections. This is usually done by installing a certificate on the client machine. Once the configuration is complete, all traffic between the server and the client will be encrypted. This means that data sent over the network will be secure and can’t be accessed by anyone else.
Server & Certificate Prerequisites
- The SSL certificate must be issued for server authentication. The certificate name (CN) must be the fully qualified domain name (FQDN) of the machine. You can verify this as Enhanced Key Usage property of the certificate, which must specify Server Authentication (1.3.6.1.5.5.7.3.1).
- The server must have an installed (imported) certificate and SQL client machines must be set up so as to trust the root authority of the certificate.
- You must be running SQL Server Configuration Manager under the same user account as the SQL Server Service unless the service is running as a Local System, Network Service or Local Service.
- The certificate must be stored either in a local computer certificate store or the current user certificate store.
- The system time must be such, which is after the “Valid from” property of the certificate and before the “Valid to” property of the certificate.
- The client must be able to verify the ownership of the certificate used by the server.
We will go through the following points to enable encrypted connection with SQL Server :
- Provide with (install) a certificate on the server
- Export the server certificate
- Configure server to accept encrypted connections
- Encrypt a connection from SQL Server Management Studio
Provide with (install) a certificate on the server
Providing with a certificate is the process of installing a certificate by importing it into your machine.
- On the Start menu, click Run. In the opened dialog box, type MMC and click OK.

Run Menu
In the MMC console, on the File menu, click Add/Remove Snap-in. - In the Add/Remove Snap-in dialog box, click Add.
- In the Available Snap-in dialog box, click Certificates, and then click Add.

Add Remove Snap In
- In the Certificates snap-in dialog box, click Computer account, and then click Finish.
- Now, in the Add/Remove Snap-in dialog box, click OK.
- Go to Certificates snap-in, expand Certificates, expand Personal folder, and then right-click Certificates, point to All Tasks, and then click Import.

Import Certificate - At Certificate Import Wizard, browse the certificate path and add to the computer, close the MMC console.
Export the server certificate
- Go to Certificates snap-in, locate your certificate in the Certificates/Personal folder, right-click the Certificate, point to All Tasks, and then click Export.

Export Certificate - Complete the Certificate Export Wizard, storing your certificate file at your convenient path.
Configure SQL server to accept encrypted connections
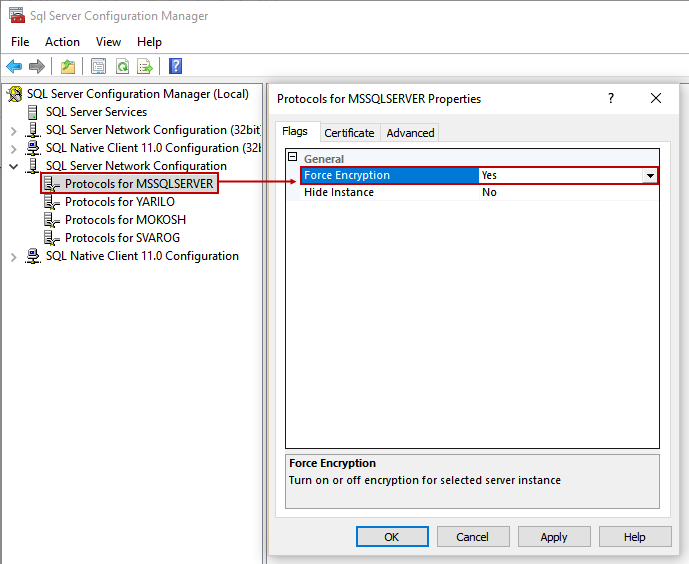
- Open SQL Server Configuration Manager, expand SQL Server Network Configuration, right-click Protocols for <server instance name>, and then select Properties.
SQL Server Configuration Manager

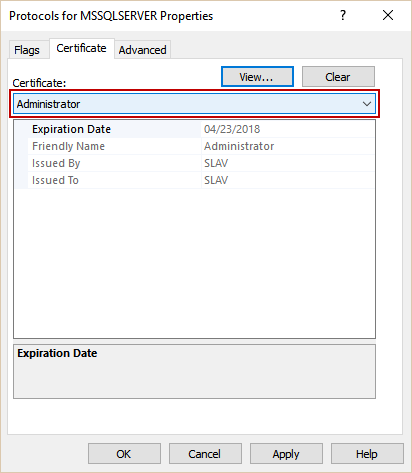
- At Properties dialog box, on the Certificate tab, select the desired certificate from the drop down menu for the Certificate box, and then click OK.
- On the Flags tab, in the Force Encryption box, select Yes, and then click OK to close the dialog box.

- Restart the SQL Server service.
Encrypt a connection from SQL Server Management Studio
-
Configure SQL Server to use encrypted connection
Open SQL Server Configuration Manager, expand SQL Server Network configuration, choose Protocols properties for a desired SQL Server instance (in this case, it is a default instance). Enable ForceEncryption option in Flags tab,
and choose the certificate from drop-down menu:
Confirm the settings and restart the SQL Server service to apply changes.
Checking Whether Connections are Encrypted
Although sp_who2 doesn’t include information about whether each connection is encrypted, there is a DMV that does this. The DMV is sys.dm_exec_connections, this has a row for each connection to the instance, and the column encrypt_option is a boolean value which describes whether the connection is encrypted. The following query will list all connections and whether they are encrypted :
-- list connections and encryption status
SELECT  session_id,encrypt_option
FROM sys.dm_exec_connections
This query can then be extended to list the number of encrypted and the number of unencrypted connections :
-- Summarize number of connections of each type
SELECT
SUM(CASE WHEN encrypt_option='FALSE' THEN 1 ELSE 0 END) AS [Number of unencrypted connections]
 ,SUM(CASE WHEN encrypt_option='TRUE' THEN 1 ELSE 0 END)AS [Number of encrypted connections]
FROM   sys.dm_exec_connections
Comments
0 comments
Please sign in to leave a comment.